Saturday, January 12, 2013

Homemade Granola

Granola is delicious. Homemade granola is even better, and it costs next to nothing to make. For about $2, you can have 2-3 boxes worth of store bought granola. And, it's incredibly hard to mess up.

Here's your recipe:

Homemade Granola

Preheat the oven to 350F & butter/grease a 9x13 baking dish

In a large bowl combine:
10c outmeal 
1c wheat germ 
1/2c flax seed 
3 Tbs cinnamon
2 tsp nutmeg
2 tsp allspice

Mix thoroughly.

In a small saucepan combine: 
1 stick/c butter
1 1/2 c brown sugar (you could do less if you wanted less sweet granola) 
1/4 c honey 
2 tsp vanilla (the vanilla will cause the mixture to bubble a bit, so be sure you're using a big enough saucepan, or have a spoon ready to stir)

Heat, stirring often, until ingredients are melted into a thick syrup. Pour over dry ingredients. Stir thoroughly until the dry ingredients are equally coated with the sauce. 

Pour into a buttered 9x13 baking dish. Place in the oven, towards the middle of the oven, for 45 min - stirring every 15 min. If the granola starts to look too brown, or burn on the bottom, turn down the heat or remove the granola from the oven. 

Let the granola cool completely before transferring to an airtight container. 

Note: if you want chunkier granola, don't stir at all after removing from the oven after baking. Let cool completely, then break apart as you transfer to a container/ziploc bag. If you want un-chunky (smooth?) granola - stir thoroughly during the cooling process.

Serving suggestions:
With milk
With yogurt and fresh fruit (my kiddos favorite)

Variations:
Add dried fruits or nuts before or after the baking process
Add any dried flour/grain with the dry ingredients/in place of some of the dried ingredients- flaxseed, wheat germ, wheat bran, bran flakes, leftover cornflakes, crushed Weetabix. The beautiful thing about granola is you can switch out/add ingredients without much cause for alarm or fear of disaster. I often finish up all those annoying bits of leftover cereals (even raisin bran and rice crispies) in my granola - really the sauce is the most important bit. And with enough cinnamon, honey, and butter - who can go wrong?!

If you come up with a great variation, I'd love to hear about it!

Enjoy :)

Meal Planning 101

If we're really going to do this year of meal planning thing, I should give you a couple pointers on meal planning, and a bit of an insight into my 'creative process'.

Firstly - don't bite off more than you can chew. If you work full time, figure out ways to do crock pot meals, meals in advance, prep in advance, etc. Definitely have those 'bad day back-up' options. If you have little kids, figure out the best time of day to do your meal prep. In our house - predinner hour is children witching hour and so I do as much of my dinner prep during morning 'happy hours' as possible. I also find I can do a lot of prep during lunch time. For my own sanity, I try not to be in the kitchen during nap time - nap time is my time (to watch shows on hulu, eat a lunch in peace and quiet, take a nap, work out, etc).

Secondly - make sure you have all the necessary ingredients in the house before you start cooking. Nothing derails a good meal like not having the ingredients. On a similar note - familiarize yourself with good substitutes (applesauce for oil in baking, for example) so if you do find yourself missing an item you aren't paralyzed with fear/threatened with a shopping trip while the family sits hungry. Lastly - make it a goal to eventually be able to tell which ingredients are crucial to a recipe. Lots of recipes have lists and lists of ingredients, but some of them can be left out without dramatically changing the final product too much (obscure seasonings fall into this category quite often, though definitely not always). This will also save you last minute shopping trips to pick up sesame oil or dried fennel.

Thirdly - plan meals that have ingredients in common. If you're feeling like it's a week for potatoes - embrace the potato theme (homemade french fries, baked potatoes with toppings, mashed potatoes, potato soup, etc). Things are cheaper in bulk, so if you can plan a week of meals with similar ingredients it will save you space, money, and time.

Fourthly - leave a night or two blank. Stuff always comes up, some days cooking is just out of the picture and going out/pizza delivery is an absolute must, there are always more leftovers than you think there will be...there is absolutely no reason to plan 7 meals for 7 days. 4-5 meals for a week (for a family of 4 that hosts others a couple times a week) is perfectly adequate.

One note, before I introduce you to this week's meal plan and shopping list - I usually cook enough for 4-8 adults. Why? I love leftovers. Not always the next day (though my kids get them for lunch, and the hubby takes them to work) but because enough leftovers means another weapon in my arsenal of 'bad day back-ups'. While it may take 20% more time to make a bigger batch, it saves you the other 80% you would spend if you made the same meal twice.

This week's meal plan....so excited!!! 

Theme: chicken & root veggies (potatoes, carrots, sweet potatoes, onions, parsnips)

Sunday - Roast Chicken
(this meal will be the base/provide ingredients for several other meals, don't skip it)
* Roast chicken with potatoes, onions, carrots
* Rosemary Bread (Cosco sells an amazing rosemary bread - and while I've made some good ones, this week we'll use theirs...plus, it, like everything at Cosco, comes in a pack of 2 and stays in the freezer quite well for a month or two)

Monday - Salad Night
* Roasted Root Veggie Salad with honey-dijon mustard dressing (salad on Monday night because I'm doing my shopping over the weekend, and don't want the fresh greens to go bad)
* Rosemary Bread (we won't finish the loaf on Sunday night - let's use it again!)

Tuesday - Indian Food 
* Palak Paneer (creamed, spiced spinach with homemade cheese - yup, we're making cheese. You won't believe how easy it is. I mean, it's stupid easy)
* Chicken Tikka Masala (we're using leftover chicken from Sunday night) 
* Naan (I'm making mine this week, but if you want to buy some - Trader Joe's sells great ones. Avoid frozen ones, if you can. The non-frozen ones will stay good on the shelf for a week or so, and in the fridge for a couple weeks, I think)

Wed - Leftovers

Thursday - Soup Night!
* Sweet Potato & Chili (we're using chicken stock we'll make from Sunday night's chicken)
* Rosemary Bread - we'll still have some leftover, but if you don't, just use whatever bread you prefer

Friday - Freezer Meal 
* Pasta with white sauce, artichoke heats, and bacon 
(If you don't already have this in your freezer...which you probably don't, just make sure you get the ** items on the grocery list. I'll put the recipe up for it on Friday to have in our arsenal for later) 

Saturday - Open Night

Non-Meal/Staple Items

Homemade Granola
Greek Fruit and Nut Pastries
Chicken Stock 
Oatmeal Chocolate Chip Cookies

Our Breakfasts
Cereal
Eggs
Oatmeal
Bagels & cream cheese
Granola 

Our Lunches
Mac N Cheese
Leftovers
I have no idea what else...I hate lunches

It's a big week, but it should be so much fun! And while you may feel intimidated - this won't take you more than an hour a day to make. I promise. Promise. I dare you. Try it. (most days will probably only be 30 min max)

Shopping List:
# - items not required for this week's dinners, but good to have on hand for other meals/staples

Produce (I do my produce chopping at cheap produce markets, not at mainstream grocery stores where the prices are much higher. Do a yelp search for the nearest produce market near you) - 
Carrots (4)
Ginger (3" piece. I use mine in teas and other things, so you could get much less)
Spinach (large bag)
Arugula or other mixed greens (3c worth - approx)
Shallots (4) (if you have other onions on hand, those will do just fine)
Sweet potatoes (3)
Potatoes (3)
White onion (1)
Red onion (1)
Tomatoes (4)
# Lemon (2 large)
# Pears (6) # (4 of them are for just munching, 2 are for the soup)
# Apples (6)


Non-Produce
Whole chicken (yes, you need one with the bones and guts. Be brave!)
Bread (some yummy bread to go with soups)
Whole milk
Cheese Cloth (can be hard to find - try your local grocer, Michaels, or an international food store)
Flour (# if you're buying Naan)
Oatmeal (#if you don't want to make granola)
Bagels #
Yogurt - natural and vanilla (#vanilla is optional - my kids LOVE vanilla yogurt. You need the natural)
Confectioners Sugar (# if you don't want to do the Greek Fruit & Nut Pastries)
Eggs #
Chocolate Chips # (if you don't want to make the Oatmeal Choco Chip Cookies)
Cream


Already in my house (these really don't go bad, and add a lot to your kitchen's diversity/ability to meal plan & cook easy. Just like any art, cooking is a bit of an initial buy-in. But it's well worth it. Spices are cheapest at international food stores, and so far - I haven't found a big difference in quality between recognized name brands, and off brands. cheap is good. Buy honey and olive oil in bulk.):

Staples List: 
Garlic
Olive Oil
Cumin
Salt
Pepper
Turmeric
Corriander
Butter
Sugar
Vanilla
Baking soda
Baking powder
Honey
Flaxseed
Wheat Germ
Cinnamon
Cayenne Pepper

 If you're doing the initial buy-in, your groceries are going to exceed the $50-$75 we're going for this week...but I think the dinner specific items are well within the realm of reasonable for that budget. Of course if you go all organic, your bill will be more.

So...there you go! If you have requests on how I organize the meals/shopping list, let me know. I'm just getting started on this so nothing is set in stone.

If you decide to cook along with me, I'd love to know! And I'd love to know how your experience goes. A lot of my recipes will appeal more to confident cooks, but even if you're not a confident cook - I really think you can do it!

Off to get dressed and go to the grocery store!


Friday, January 11, 2013

Trying Out a Daily (almost) Food Blog

So...welcome back to my kitchen. It just relocated to Seattle, and has made a few upgrades:

* out with the non-stick, in with the stainless steel (If you're considering this, do it. And if you're going to do it, get your stainless steel at a restaurant supply store - much cheaper and still stainless steel. Sure beats mainstream store prices)
* out with the knife block, in with the Golden 3 (8in chef's knife, 5in paring knife, and 10in bread knife - after a month of this, I have yet to want another knife)
* immersion blender (I got this exact one at Cosco for $35) and mini-food processor - for the solid, and irreplaceable win. Your soup making will be revolutionized, and your chopping time cut by half.

Here are my food goals for the year:
* meal plan - every week. My lovely sister-in-law got me an amazing fridge-magnet meal planner and I am immensely enjoying it.
* salad night once a week
* vegetarian night once a week (salad night doesn't count, and won't always be vegetarian anyway)
* keep our grocery budget under $300 a month - I'd love to do $200 a month, but I think $300 is a little more realistic
* as much organic as possible
* as much from a humble "I live in a rental" garden as possible

So, here's my plan - every night I'll try and post a brief recipe (emphasis on brief, since this is an every night endeavor) and once a week I'll post our meal plan and shopping list. If you want to cook along with me, a day or week behind, feel free to. This won't be a blog with amazing pictures (though I'll try) and I'm quite sure I'll miss a few days, but I'm going to at least give it a shot.

Before we get started, and if you're new to my kitchen blog, let me give you a little bit of my 'chef' philosophy - I think everyone has potential to be a great cook, if you have a love for food. If food and eating fall in a sort of 'eh, I do it to survive' category - it will be much harder to be a great cook. To be a great cook, you must LOVE to eat.

Secondly - cooking, like any skill, sucks until you get good at it. But, if you stick with it, I promise you (yes you) can be a great cook. Just like any art, the right tools, supplies, and emergency back-up plans make success all the more attainable. With that in mind, my freezer usually holds some 'bad day back ups', and my pantry (currently a wire shelf from home depot) is always stocked with what I consider to be the essentials.

To spare you the bore of list of what's currently in my kitchen, I'll just make sure to include a list of "items already on hand" in whatever shopping list I put up at the beginning of the week - if I consider it an essential, I'll indicate it as such.

OK - enough details! To give you a glimpse at this past week - here was our meal plan

Sunday - Homemade tacos (which includes homemade tortillas, and usually includes homemade refried beans - but that didn't happen this week)
Monday - Lasagna with garlic bread and sauteed asparagus
Tuesday - Leftovers
Wednesday - Spinach Salad with hardboiled egg, walnuts, feta cheese, dried cranberries, and Trader Joe's Champagne Pear Vinaigrette salad dressing
Thursday - Roasted Tomato Soup/Bread
Friday - Crockpot Beans and Rice
Saturday - no plans

So, here's the scoop on tonight's dinner (I'll put up details/recipes on the above recipes whenever they are re-circulated in future weeks).

I wanted to try something with beans and rice, since so many cultures eat something along these lines as a staple.

Crockpot Black Beans and Rice 

2 cups homemade chicken stock (recipe to come at some point) 
1 cup dried black beans
1/2 large yellow onion, chopped
4 large cloves garlic, diced 
1 can corn, liquid included 

Combine the above in a crock pot and let cook on low for 2 hours. 

1 cup dry rice 
1 large can of whole cooked tomatoes
1 Tbs cumin 
1 tsp salt
2 cups water 

Add to the crock pot, stir thoroughly, and let cook for another 2 -3 hours. 

Viola - dinner. Done.

Be sure, if you're home, to check the amount of liquid periodically as beans and rice both absorb great amounts of water. If you're unsure, add an extra cup of water or chicken stock (my recommendation if possible) - the worst that will happen is you'll have a more soupy dish, as oppose to a dry one. If you add way too much - you've just made soup :)

Couple quick fix tips - though this recipe is pretty direct and chopping - free.
* use a mini food processor for the garlic and onions
* if you need to make this and leave home for 6 hours, toss everything in at the same time - being sure you leave plenty of liquid- stir thoroughly, and set your crock pot on it's lowest setting

I'll be serving mine tonight with Greek Natural Yogurt, homemade salsa, and possibly diced bananas. I'll let you know in the next post how it goes, and will retroactively add a pic to this post.


Thursday, September 6, 2012

Chocolate Fruit Cups

Here's my little disclaimer - if you are an impatient cook, or easily disappointed in yourself as a vicarious response to any of your culinary attempts failing - don't try this :) When you're a bit more patient, and more flexible with yourself - then try this.

These little fruit cups are amazing for bridal showers, baby showers, and lingerie parties - ladies love them! And appreciate their prettiness - don't serve these at a Super Bowl party or World Cup final.

I'm sorry I don't have more pictures - hopefully my instructions are clear enough, and next time I make them, I promise to take better pictures and add them to this recipe.

Chocolate Fruit Cups:
1 bag chocolate chips
2 Tbs butter
4 c of assorted fruit
muffin tin
paper muffin cup liners (silicon would also work amazingly well, I would think - though I haven't tried it).

Using a double boiler, or a microwave, melt the chocolate chips and butter. The key to this is to stir frequently, and don't let your chocolate over-heat. If it overheats, it separates and turns into an unusable (and unsavory) mess. You can actually remove the chocolate from the heat (or microwave) when there are still some small pieces of chocolate left - the heat from the already melted chocolate will finish the job. Stir until your chocolate is smooth.

Before you begin the next step - make sure your chocolate isn't too runny. If it is too runny, let it sit for a few minutes. You want it to be the consistency of a runny hummus - sounds delicious, huh? I couldn't think of a better example, sorry.

Using a pastry brush (or I used a teaspoon because I didn't have a pastry brush), put approx 1 Tbs of chocolate in a muffin cup, and gently spread around the bottom of the cup and up the sides until your chocolate is evenly distributed. You'll probably have to pick up the muffin cup and delicately turn it as you spread the chocolate evenly. The main goal is to have your chocolate evenly distributed - you don't want it to be so thick it's difficult to eat, but you also want it to be thick enough it can hold it's shape. See the finished picture if you want to double check suggested thickness.


Once your chocolate is evenly spread in the muffin cup, place the muffin cup inside a muffin tin. Repeat until you've used all of your chocolate. Place the muffin tins, full of pretty little chocolate muffin cups, in the refrigerator for about 2 hours - or until the chocolate is hard.

Remove from fridge and try to take a chocolate cup out of the tin. If it sticks you can either wait for your muffin tin to warm to room temperature, or use a 9x13 with warm water and lightly dip the bottom of your muffin tin in the water - essentially offering a quick shot of heat to the muffin tin, which will release the muffin cups. Very carefully, and being sure not to grip the chocolate too tightly (it will melt in your fingers), begin peeling back the muffin cup. Some muffin cups will almost pop right off, other needs a bit of persuading. Just have patience, peeling the cup back until you have a pretty little chocolate cup!

Once you've finished, put your undressed little chocolate cups back in the fridge for about 20 minutes to let them set. They can stay in the fridge for a few days if they are in a sealed container.

Immediately before serving, fill each cup with approx 1/2 c fresh berries. Serve with pride :)

Let me know how this works for you, and don't be discouraged if it takes a few times - these were my 3rd time making this recipe! I've done this recipe both with and without the butter - the butter makes the chocolate a bit smoother, and potentially the muffin cups a bit easier to pull off...but it's 2 more Tbs of butter. Then again, we're talking about chocolate cups - we probably aren't worried about 2Tbs of butter :) Good luck!!

Wednesday, September 5, 2012

Flour Tortillas

I love burritos - especially homemade ones. Everything in a burrito should be homemade - the beans, the guacamole, the salsa (ok, you can buy cheese) and especially the tortilla shells. Now, I know, I know - it is just SO convenient to buy them from the store. It is, I'm not arguing. But they taste fake - like a combination of playdoh and some week old bread product. Anyway - you get the point, I'm not a fan.

And here's the truth - homemade tortillas are incredibly easy to make. Rolling them into a perfect circle is a different story, unless you have one of those nifty tortilla presses (which I'm putting on my list for Christmas) but even with the use of a rolling pin (or a beer bottle or wine bottle) you'll eventually perfect your circles. In the meantime, no one needs a perfectly round tortilla to make a delicious burrito. And if they are terribly shaped, eat them plain or make them into tortilla chips.

Homemade tortillas made into quesadillas - great leftover use for remaining burrito ingredients! Also featured - homemade salsa.
So - here you go, the decades old flour tortilla recipe from my Indiana-grown/African-lived mother's kitchen (so obviously authentic):

Flour Tortillas
yields approx 8 9" tortillas

2c flour
1 tsp salt
1/4 c shortening (don't try and substitute this for oil - they turn out  greasy. Sorry)
1/2 c warm water

In large mixing bowl, combine flour and salt. Using a pastry blender (or two knives) - cut the shortening into the dry ingredients until the shortening is pea-sized or smaller.

Add 1/2 c warm water - usually about 2Tbs more depending on how accurately you measured your 2c flour.  Mix, using your hands, until all the dry ingredients are absorbed - you may need to add more water than directed, but do so slowly - you don't want to over water your dough! You want your dough to be soft, not rubbery, and smooth. Rubbery dough is a result of over-kneading, so resist the urge to knead this recipe. This isn't bread. Just add the water and mix until all of your ingredients are smoothly combined.

Cover the dough with a damp towel and let sit for 2 hours. (If you're working ahead, you can cover tightly - in a sealed container, for example - and refrigerate for up to 24 hours. If you do this, pull out the dough an hour or so prior to use to allow the dough to come to room temperature - it will make it much easier to roll out).

Divide your dough into eight equal pieces - they should should be the size of golf balls, or a bit bigger. Flour your rolling surface and roll each ball out individually, being sure to rotate and flip the tortilla to make sure it doesn't stick to the counter (and because this will greatly improve your chances of achieving a round tortilla). Roll until you've reached your desired thickness - I like very thin tortilla shells, some people like them a bit thicker. I'm sure you've had a tortilla at some point in your life if you're considering home making them...make it as thin or as thick as you like.

Warm a non-stick skillet (cast iron is awesome - but not necessary) over med-low heat. Place your tortillas in the skillet (one at a time) and let cook until air bubbles begin to form, flip and allow the air pockets to re-form. Remove from skillet and put on a plate. Cover with a dry towel. This towel will help keep your tortillas hot, and very soft. I actually put the towel directly on the plate, the tortillas on the towel, and fold half of the towel over the tortilla. This prevents the bottom tortilla from getting wet with any condensation that forms as the tortillas cool.

Serve with homemade salsa, and all of your other favorite burrito fixings! (I recommend refried beans, seasoned ground beef, guacamole, lettuce, cheese, sour cream, and red onions).

Enjoy!!!

Storage note:: homemade tortillas freeze exceptionally well. Whenever I make them - I quadruple the recipe (or more). For freezing purposes: when cooking them, I highly recommend flash cooking your tortillas - in other words, prepare the tortillas exactly as directed above but when you get to the cooking phase only cook each side of the tortilla for 5-10 seconds. Just long enough to dry the outside so when your frozen tortillas are thawing, they don't stick together. If you freeze them just as rolled out dough, or even as balls of dough, they will stick together. Not fun.

You could cook them all the way and freeze them, but then they don't re-warm as well and are often quite dry or even brittle. Flash cooking allows you to thaw them without fear of them sticking together, and then you can finish the cooking process (as mentioned in the original recipe) just before your meal. Your tortillas will taste as if they had just been made, even if they were frozen for up to 2 months.

When you freeze them, I recommend wrapping your stack (I usually freeze them in sets of a dozen) in foil and then sealing in a ziploc.

Last side note - ground beef and refried beans can also be frozen - you can have homemade tacos on the table in 20 min if you double your quantities on your next taco night and freeze half of it!!! 

Tuesday, September 4, 2012

Mango Chutney

This is an incredibly easy recipe! I've looked at a bunch of chutney recipes, and had never attempted them. Then, I was staying at beach house in lovely Watamu, Kenya when the chef offered to make a mango-chutney to go with the delicioso!! feta & coriander samosas I was making. Here's the low-down on homemade fruit chutneys (at least for use within a week or two - not sure how much longer it would last): it's basically cooked fruit, a bit o' vinegar, and a bit o' brown sugar.


Knock your socks off Mango Chutney
makes approx 1/2 cup (so I recommend doubling)

1 ripe mango - cut into medium size pieces
1 Tbs cider vinegar
2 Tbs brown sugar

Put all ingredients in a skillet. Saute until the mango is completely soft, stirring frequently and mashing mango as you go. The end.


It's seriously that easy.

Now - a few notes:
* if it burns just a little bit, don't worry. I think it adds a delicious burnt flavor. Who doesn't love burnt sugar? Creme brulee, anyone?
* you can add ANY complimentary fruit - I've done apple and pineapple so far. And it can be in any shape - I had old pineapple, it made an awesome addition to the chutney. My kids didn't eat all the apple slices I served at lunch. At dinner - I added their leftover apple slices to the chutney I was making. It was awesome. Here's a suggestion - anytime you have fruit that's on it's way out, freeze it! You can always toss it in muffins, and now you can toss it in chutney, too!
* I think green onions are a delicious addition to this mango chutney, especially if you are eating them with the Feta & Coriander Samosas.

Ok - enjoy!! Let me know how you like it and what fun chutneys you create!

xo - sarah

Feta & Coriander Samosas

Sorry it's been so long! I'm trying to revamp my blog life...here's an attempt at putting up a new recipe each week.

SO - SAMOSA TIME!!! If you've never had a samosa, keep reading...then make this delicious recipe and the mango chutney recipe I'll put up next, call over some of your best friends, bust out a bottle or two or three of red wine and ENJOY!


Feta & Coriander Samosas


When making samosas, please don't cheat and use puff pastry for the dough. It's just not the same, and you're better off putting in a bit of extra elbow grease. These aren't super healthy, and you're going to eat a lot of them - so the more calories you burn making them, the better.

For the dough, I'm just gonna refer you to this fantastic samosa recipe - I hope that's ok! Follow her directions for the dough - though I roll mine out a bit bigger, between 9-10 inch diameter (that's the width from one side to the other, for those of you who hated geometry). Cut as she directs, right in half. She folds hers in half, which works great. I've included pics below of the process I use. There are other methods, which you can do a quick search for, but the basic idea is to make an ice cream cone, put the filling in just as you would ice-cream, then seal the top.

Ok, for the filling:

Feta & Coriander (Cilantro) Samosas
 yields 16-20 samosas

Filling: 
2c crumbled feta cheese
1 medium sized red onion, sauteed in 1Tbs butter
1/3 c chopped green onions (the smaller, the better)
2-3 Tbs fresh lime juice
2/3 c chopped fresh coriander (cilantro)
1 Tbs powdered cumin

Paste:
2 Tbs flour
2 Tbs water
* combine into a paste - should be the consistency of glue, set aside.

Mix the above Filling ingredients together, making sure everything is mixed in well but taking care not to turn your delicate feta into too much of a schmear. Prepare the aforementioned dough recipe, rolling out your dough as if you're rolling tortillas.

Follow any version you prefer of folding - here are pics of my method (please ignore my horribly unmanicured fingers...a girl can only keep up with so much):

Cute your samosa round in half. Then, taking the bottom corner closest to you, fold the dough diagonally up to the opposite side (see pic below).
Using your finger, spread a bit of the flour paste across the edge closest to you.
Fold the opposite side across so your straight edges line up, press gently along the seam.
Open up the top of your samosa, leaving good room for putting in the filling. Using a spoon, put in the filling (sorry no pic!).

Spread a bit of flour paste across one side of your top opening.
Pinch your edges shut securely.
Almost ready for the pot! just needs edges trimmed.

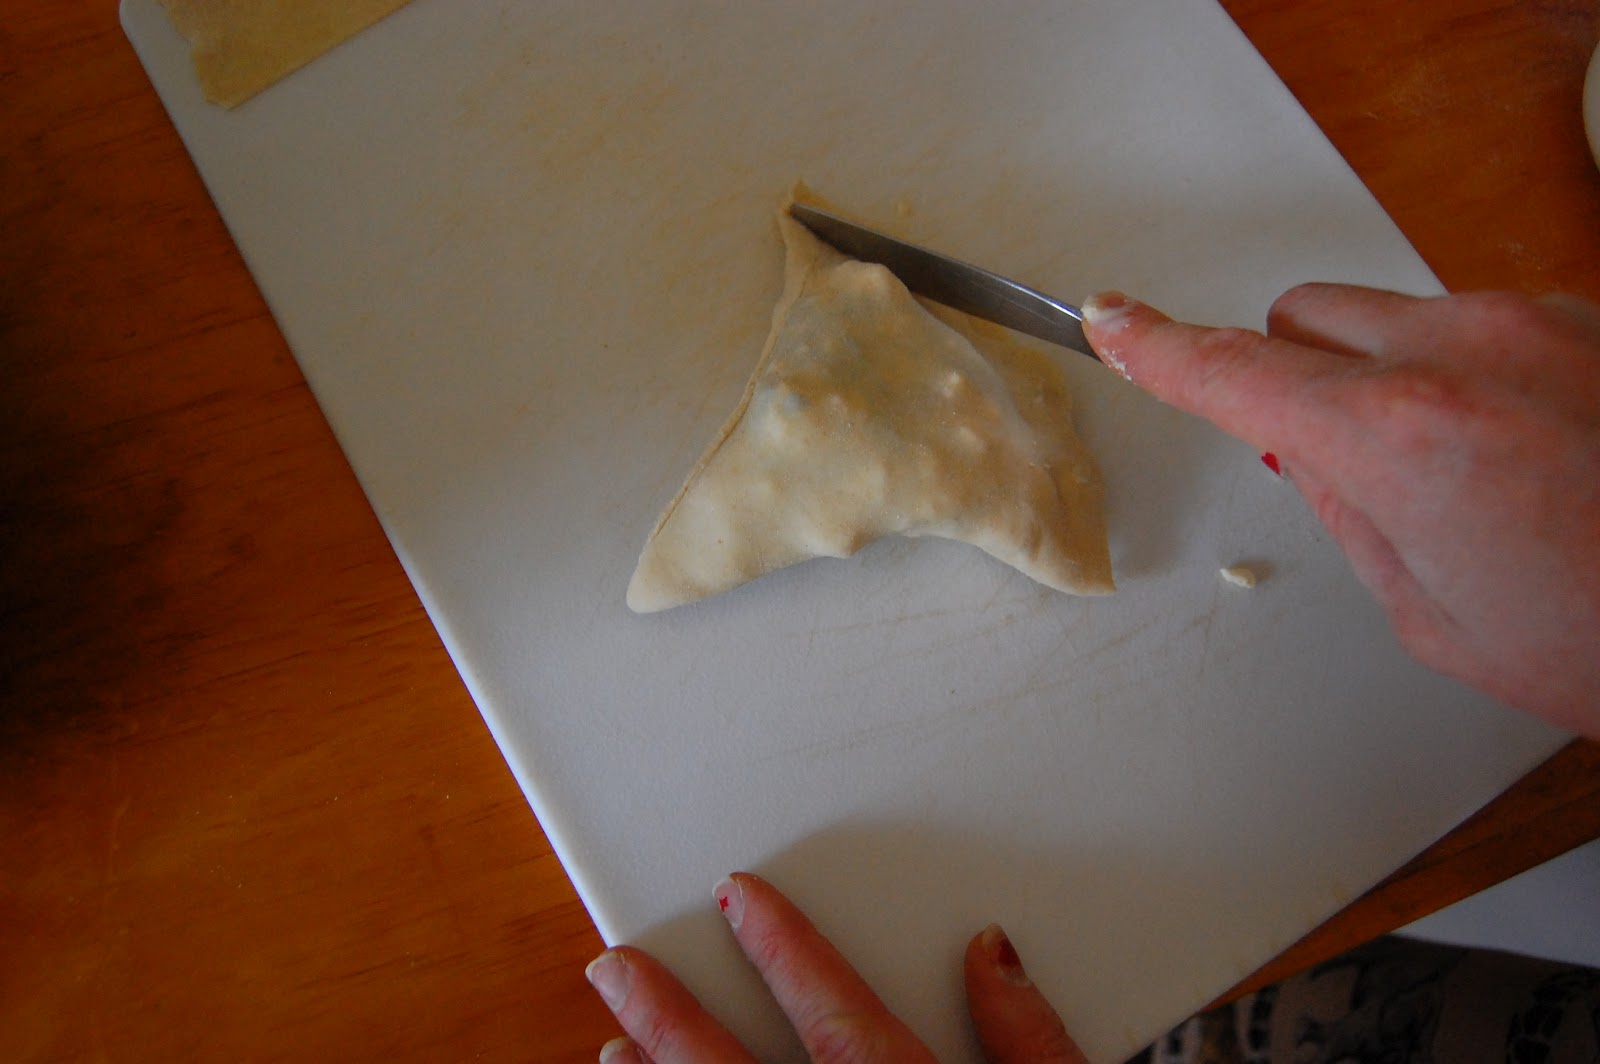
Trim off any excess edges - being sure not to re-open your nicely sealed samosa.
 If you have a hole, pinch it shut. If it won't stick, use some of your flour paste to hold it shut. If you have a huge hole, consider using some back up dough as a band aid - and use the glue to hold it in place as necessary. Set aside. Prepare all of your samosas.

Pour enough sunflower oil into a deep pot for...you guessed it...deep frying samosa time!!! Once your oil is hot enough (drop in a little extra piece of dough to test. The oil should immediately start bubbling, and the dough should turn brown within 30 seconds or so) drop in as many samosas as can comfortably fit in the pan. You'll need to flip them after about 30 seconds, so take care to not overcrowd. Fry each samosa until both sides are a nice, golden brown - approx 30 seconds each side.

Remove and let excess oil drain off. I actually put a cookie sheet lined with newspaper under a cooling rack - works really, really well. Once drained, put in a dish with a lid - the extra moisture from the samosas cooling will help take away the unsavory over-crunch that can occur with deep frying thin dough.


Serve warm with homemade mango chutney & a glass of red wine. Or two. Enjoy!!!

ps - I know this seems like a brief recipe for what could be a complicated process...you can do it! Feel free to write with questions, and next time I make these, I'll try and take some pics to enhance this entry. Let me know how they turn out!!!

xo - sarah